| How to install your Kvaser hardware under Windows XP, Win2000 and Windows Server 2003 |
|
| This guide describes how to install Kvaser Hardware under Windows XP. The information given here is also valid for Windows 2000 and Windows Server 2003, since the steps are basically the same. |
| 1. Administrator. Log on to Windows as an administrator or as a user with administrator privileges. |
|
| 2. Run the installation program. Execute the file that is labeled “kvaser_drivers_w2k_xp.exe”. If you install under Windows 2000 or Windows Server 2003, simply execute the same file. |
|
| 3. View README file? When the installation program has loaded, you are asked if you wish to read the README file. We recommend that you do so, it contains information that is very useful for you. |
 |
|
| 4. Welcome. At this point, you are ready to set-up the installation on your computer. Click on the “Next” button to continue. |
 |
|
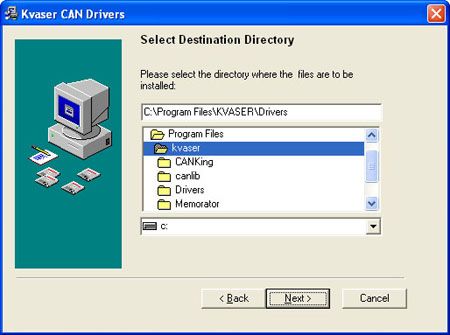
| 5. Select Destination Directory. We recommend that you keep the default value. Click on the “Next” button to continue. |
 |
|
| 6. Select Start Menu Group. We recommend that you to keep the default value. Click on the “Next” button to continue. |
 |
|
| 7. Ready to install. The set-up is now complete and you are ready to install drivers for all your Kvaser hardware. Click on the “Next” button to continue. |
 |
|
| 8. Copying and registering files. The installation program will copy the driver files to your hard disk and register them with Windows. Wait a few moments for registration to finish. This will normally take about 10 seconds, but could take as long as a few minutes. |
|
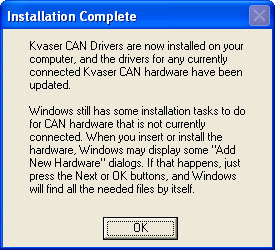
| 9. Installation of drivers complete. If the installation of drivers is completed successfully, the following message pops-up. Click on the “OK”-button to continue. |
 |
|
| 10. Control Panel. Open the Control Panel. Double-click on the icon labeled Kvaser Hardware. You should see a window like the one shown below. You are now ready to install all your Kvaser hardware. |
 |
|
| 11. Plug-in Kvaser Hardware. You have two options:If you are about to install a Kvaser PCcan/PCIcan/PCIcan II board, shut-down the computer before you insert the board. And then restart the computer again.If you are about to install a Kvaser Leaf/Memorator/USBcan device or KvaserLAPcan/LAPcan II card, just plug-in the device. You don’t have to shut down the computer. |
|
| 12. Found New Hardware Wizard. The Found New Hardware Wizard will detect your Kvaser hardware. We recommend that you select “Install the software automatically”. Click the “Next”-button to continue and follow the on-screen instructions. |
 |
|
| 13. Your Kvaser hardware is installed and ready to use. Open the Control Panel. Double-click on the icon labeled Kvaser Hardware. This program handles all Kvaser Hardware that is connected to the computer. Clicking on a device channel opens up a panel with more detailed information, for example CANLIB channel, firmware revision, serial number, etc. Press F1 for Help. |
 |
|
| 14. How to install Kvaser hardware under Vector CANalyzer/CANoe. If you use Vector CANalyzer/CANoe, please go back to the Support note index and read the “How to install Kvaser hardware under Vector CANalyzer/CANoe” note. |
